A Devastatingly Effective Weight Free Workout.
By Raymond Onyango

Ladies and Gentlemen: It is said, ‘The proof of the pudding is in the eating’ and here at the beginning of the year, we have the perfect chance of doing something our about our physical appearance rather than just merely talking about it. Of course doing something means that when you get off your screen right after reading this, you will have a simple, effective plan of action that you can put into place immediately, without leaving room for further procrastination. This plan is composed of simple but highly effective exercises that need little, if any equipment to perform and which can guarantee you even better results than some fancy health club membership if you actually get around to doing them.

This ‘plan’ is built around a training concept I fundamentally believe in’ because I have see it work consistently, on heaps of occasions – Circuit Training. Circuits are great because they are complete; they give you strength and cardio in one neat package that’s time efficient, genuinely effective and infinitely exciting. With circuits boredom is not an option, the quick reaction time will keep all of your senses engaged and your attention riveted, the quick movement will get your heart racing like a lawnmower and the never ending variety will satisfy your need for challenge and sustain your interest – it doesn’t get better than this!

Question is what makes a good circuit? For a circuit to be effective, it needs first and foremost, to be balanced. Balance means that upper body exercises must be matched by lower body exercises to preserve proportions and antagonist muscle groups, must be trained in opposition with agonist muscle groups in order to maintain harmony in the interaction of the body’s various muscle groups. When these principles are ignored, two things are likely to happen, in the former scenario, you will end up lopsided, like so many men who only train their upper bodies but have spindly legs; in the latter scenario one group of muscles, say the abs, can overpower the lower back, throwing your spine out of whack and inviting numerous unpleasant aches and pains not to mention medical bills and loss of productive man hours.
Secondly, when you are working with your body weight, you need to be creative! To this end there are two things you need to keep in mind – one is ‘progression’ and the other is ‘leverage’. Lets start with progression – progression simply means planning a growth curve that allows your to introduce new challenges to your body, by building on skill you have already learnt. Through carefully administered progression you can coach your self from say, the total inability to do a single pull up, to being able to polish off a dozen of them in perfect form. It also gives you a measure of your progress outside of the traditional yardsticks of weight on the scale and inches on the tape; it is the qualitative counterpart to these quantitative measuring tools. Further to this it adds the key element of variety, which as you well know, is the spice of life. Variety sustains interest and interest sustains adherence, which in turn guarantees results, and so the wheel turns…

As for leverage, a simple shift in your body position can make a tremendous difference to the level of difficulty an exercise presents. Learning to use the right kind of leverage will allow you to make simple exercises more challenging and difficult exercises more attainable by teaching your to position your body in the most helpful position for you to achieve your goals.
All right enough with the talking, lets get down to business. Here are the exercises, the breakdown of which muscle groups they influence and a host of ideas to either upgrade or down grade your level of difficulty.
Here goes:
Nail the Push up
Muscles Targeted: Chest (pectorals), Triceps (triceps brachii) and shoulders (deltoids) as prime movers, but the entire core and lower body is hugely involved in maintaining your stability in this position.

Get It Right: The push up is a common exercise but remarkably few people get the form right. For the right effect, your body should form a straight line, running from your shoulders though the hips and the knees, right down to your ankles. For this to happen the core muscles must be engaged and active the whole time. Your hands should be placed slightly outside of shoulder width apart, to help you maximize your range of movement, and protect your elbows by shifting your weight into the chest, shoulders and triceps, the three prime movers in this classic exercise.

Keeping your elbows tracking in a straight line and in alignment to your wrists, lower your body over a 4 second count until your chest is just an inch or two off the floor, pause for 2 seconds and power up slowly taking no less than 4 seconds to return to full extension. These may prove to be the most difficult ten seconds you have experienced in a long time and some of the most effective. Aim for 10 to 15 reps at one go, it if comes to easy try the harder version but if you find this too intimidating, try its baby cousin – the kneeling push up.
Criss Cross To Firm Abs
Muscles Targeted: External abdominal obliques, internal abdominal obliques, rectus abdominis (the famous six- pack) and the tranvese abdominis – basically every single abdominal muscle group.
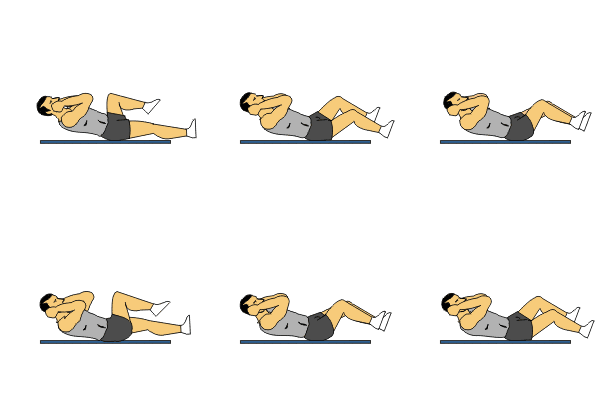
Get It Right: This exercise incorporates all the movements, save for one (extension – bending backwards) that you would ever make from your core, flexion (bending forwards) rotation (turning sideways) and stabilization (maintaining your posture). To do it right lie on your back with your knees up above you at a 90 degree angle, same for your hips – I call this the 90/90 position. Interlock the fingers while picking your elbows up over your head and bringing the palms to rest at the back of your head.
Pay close attention here act strictly from your abdominal muscles and use those to peel your spine up off the floor from the head up until the shoulder blades are an inch or so away from the floor – it is important that you do not pull on your neck at this point or you can be sure you are not getting it right yet.
Done correctly the effect of this will be to activate your abs and protect your lower back in the same motion by nestling the latter firmly against the floor. Now think of drawing the right knee to the left elbow, while extending the opposite pair of limbs away from each other, switch sides and aim for 12 to 15 reps. you can make this exercise more demanding or less so simple by regulating the distance to which you extend your legs. Make sure to breath in one way and to breath out the other way.
Squat To Improve Your Rear View.
Muscles Targeted: Buttocks (gluteus maximus and medius), Thighs (Quardiceps) Hamstrings (biceps femoris), calves (gastocnemuous) in the lower body, but the core muscles of the abdomen also play a huge role in maintaining stability.

Get It Right: If you are not squatting, you can’t claim to be training and that’s that. This is the single most important lower body exercise of them all and for good reason. They help you build quality muscle and are associated with a surge of muscle building testosterone in men – women need not worry about building Arnold Schwarzenegger type muscle, you typically have just one tenth of the level of testosterone your typical male has, but that does not in any way keep you from benefiting hugely from the muscle toning effect of this exercise. They build you overall strength like no other leg exercise in ways, which help your life on a practical day-to-day basis. They help you gain mobility and get rid of many a niggling back pain, because you need flexibility to squat right and equally as importantly they reinforce some of your most crucial weight bearing joints such as the knees, hips and lower back which will be a boon for you in your middle age when every one around you is succumbing to knee troubles.

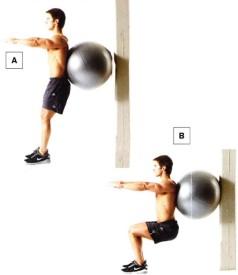
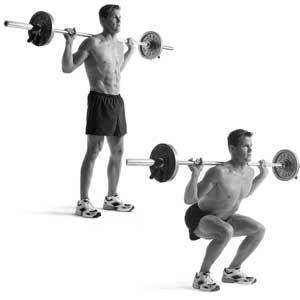
Begin with your feet hip width apart or slightly wider and the entire sole of both feet firmly planted on the ground. You want to check that your body’s main weights namely the head, chest and hips fall in a long straight line. Now go ahead and break that line up by sending your knees forwards tracking over the toes and the hips backwards and downwards in the direction of the heels. Try and do this while balancing a light exercise book on your head to help you stay upright, the moment you feel drop the book or feel the need to pick your heels up off the floor you will be sure you are at the limits of your range of motion, you should then begin to make your way back up. Keep the reps slow and consistent and aim for at lest 20 to 25 good ones at one go.
Pull Your Own Weight With The Pull Up
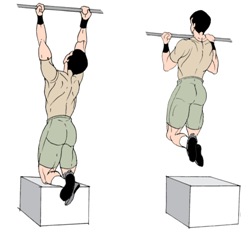
Muscles Targeted: Lats (latissumus dorsi), mid back (rhomboids), traps (trapezius) shoulders (deltoids) Biceps (biceps branchii), forearms (branchioradialis) but again the entire lower body and core musculature are invoked otherwise you find yourself swinging wildly and out of control.
Get It Right: The pull up comes in several  varieties depending on the grip employed. A supinated or underhand grip with the palms facing inwards may be the easiest place to start. Grip an overhead bar with your arms slightly inside of shoulder width apart. Engage your rhomboids and lats, using those to propel your chest up towards the bar taking your time to get there so as to eliminate momentum. As soon as you get there make your way back down in an equally slow and controlled fashion. Aim for 10 of these at ago, but do not be disappointed if you only make five. If you can’t make a single rep, try and modified pull up illustrated in the picture below. If you blow these away with ease try the pronated pull up or overhand grip.
Get your Core As Solid As A Plank

Muscles Targeted: Erector spinae, External abdominal obliques, internal abdominal obliques, rectus abdominis and the tranvese abdominis – basically every single core muscle group.

Get It Right: Drop into the push up position on the floor with your weight resting on your elbows, which should be spaced about shoulder width apart. Draw the belly button up to the spine to engage the abs until you have a line running from the shoulder to the hip, maintain this line as you pick your knees off the floor, one after the other and bring your entire bodyweight to rest in the abdomen. Keep this up for anywhere between 10 seconds to a whole minute, with respect to your physical ability. You could add a whole new level of difficulty to this by simply picking one leg off the floor or otherwise attempting the side plank variation.
Lunge Into Perfection
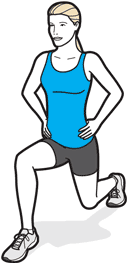
Muscles Targeted: Lunges place the most emphasis on the gluteus (buttocks) and hamstrings, but in reality they engage virtually every single muscle in the body. Moreover, lunges mimic everyday activities such as climbing stairs or the very act of walking it self and therefore perfecting this exercise has a huge carryover effect into your daily life and one that is impossible for us to ignore.
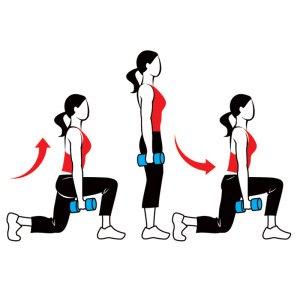
Get It Right: Start with the stationery lunge, which places the least amount of impact on your knee joints and does not require much coordination. It is simple; begin with the left knee on the floor, toes dug into the floor and your right foot ahead of you with the knee tracking directly over the toes. Keep the head and chest aligned above the hips, while picking that left knee off the floor and bringing it up to full extension. Lower gently and try again for 10 to 15 reps if you have it in you. Change sides and repeat. To up the ante try your hand at walking lunges, in the illustration above.
Tie It All Together
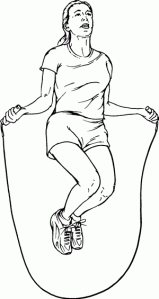
The idea behind circuit training is to keep your heart rate
elevated consistently, so that your muscle toning workout can double as a cardio one too, killing tow birds with a single stone and saving you time. This will only be possible if you maintain strict form and control, in the execution of these exercises, and limit your self to no more than a 30 to 45 second break between exercises. Attempt the circuit at least 3 times. With only 6 exercises and just about 2 minutes to execute each, the entire program would take you no more than 45 minutes, making allowance for a five minute warm up with a skipping rope and a 5 minute cool down stretch. Allow for a day’s rest in between circuits, on this rest day you can focus of a cardiovascular exercise such as walking or running or maybe even playing your favorite game- squash, Frisbee, rugby, volleyball or what ever else it may be. In one months time we will review our progress and update this program.
Have a busy week will you!
 Activities of daily living, such as hoisting a suitcase into an overhead luggage compartment or carrying your daughter piggy back, become possible without subsequent pain and injury.